
Homemade Gifts for Your Holiday Host
Hi all! I hope you're having an amazing holiday season. Personally I've felt busier than ever which is making the season fly by! This year I'm working on being more mindful of the gifts I give and trying to make them more meaningful or putting more effort behind them. It's easy to ask someone for a list and pick a few things off of it, but a good way to really show you care is to think outside the box and spend some time on your gifts! This is especially true for a holiday hostess. Someone who has opened up their home for possibly the whole family has certainly spent lots of time and effort to host you, so it would be so special to them if you reciprocated that effort. My favorite homemade hostess gifts combine some of my favorite hobbies- needlepoint and cooking! The first is a twist on a classic cranberry sauce and the second is a little needlepoint ornament!
Cranberry Sauce
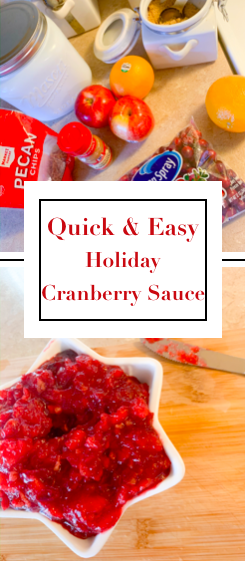

Ingredients:
1 small bag cranberries (3 cups approximately)
1 cup water
1 cup granulated sugar
2 tbsp brown sugar
2 honey crisp apples, chopped
1 tsp cinnamon
1 orange
1/4 cup chopped pecans

Method:
Add all ingredients other than the orange and pecans to a medium sized pot at medium heat and bring to a boil, stirring occasionally- just don't let it burn. After the cranberries have popped and the apples have softened, mash the berries and apples slightly so the sauce isn't so chunky.
 At this point, grate the orange's peel and toss in 2 teaspoons of zest. Then slice the orange in half and squeeze the juice of half of the orange into the mixture. Stir and let your sauce simmer until it thickens. Turn off heat when it's finished and let it cool. When it's cooled stir in the chopped pecans and then pour into a storage jar. Since this is being made specifically for my holiday host, I like to make it look festive by cutting a cute piece of fabric and laying it over the lid, and tying it with a bow.


Needlepoint Ornament

Okay, you guys. I wont lie, this one can be difficult. But only during the design phase- the actual execution after you get past that point is a breeze! In my case, there is a book and song that Theodore has been in love with for a while called Baby Beluga that I will be needlepointing for an ornament. I really want our yearly Christmas tree to be full of our family memories and things that are unique to our story so I think this will be the perfect first ornament. Since this is not a mass-produced design, I will need to draw it on the needlepoint fabric myself. If you have a design you want to do that you can't purchase off of the internet, and you don't think you could draw it out yourself, ask your artistic friends or family members if they would mind helping out!
Materials:
small needlepoint ring
needlepoint fabric (sold in rolls at Hobby Lobby)
pencil with eraser for drawing your design
all the thread colors required of your design
needlepoint needle
hot glue
hot glue
cotton quilt batting (3.99 at Hobby Lobby)
ribbon/something to make a loop to hang it
fabric cut the size you want your ornament to be
a Sharpie in one of the colors of your design (if there is an outline to your design, choose that color)
a Sharpie in one of the colors of your design (if there is an outline to your design, choose that color)
Method:
First off, breathe. Don't get overwhelmed by this! It seems daunting but you can do it! (This is me talking to myself if I'm honest lol). First place your needlepoint fabric into the wooden ring. Make sure to have an image of what you want the ornament to be in front of you, and then draw it onto the fabric. I'd suggest using a pencil so you can erase and adjust.
 When you've got the design the way you like it, begin to stitch the appropriate colors in!

After you've stitched the design, remove the fabric from the ring and cut around the design, leaving around 1/2 inch border of needlepoint fabric. Cut slits into that border to make it easier to bend back and glue down (photo below).


 As you can see in the photo directly above, there are lots of white gaps after the border of the whale that were impossible to completely fold over without folding the design as well. Here I took a black Sharpie and colored those spots black. It worked like a charm!


Cut out the cotton backing material the exact size of the design and glue it down. *Here is where I messed up!* I forgot to glue the loop to hang the ornament on the tree with before I put the backing on- so make sure to do that now! Then cut out the backing fabric slightly larger than the size of the front and glue that to the back of the cotton and on top of the loop. You'll then need to glue the sides of the fabric that overhangs the front design down to meet the front.
 Now take your ribbon (or whatever you're using for the border and loop) and carefully glue that around the sides to hide the seams. I left a space right on top where I also glued the loop since I forgot to do it earlier.
You're finished! There are a lot of steps but they're mostly simple things that add up to a beautiful gift!


After you've stitched the design, remove the fabric from the ring and cut around the design, leaving around 1/2 inch border of needlepoint fabric. Cut slits into that border to make it easier to bend back and glue down (photo below).


Cut out the cotton backing material the exact size of the design and glue it down. *Here is where I messed up!* I forgot to glue the loop to hang the ornament on the tree with before I put the backing on- so make sure to do that now! Then cut out the backing fabric slightly larger than the size of the front and glue that to the back of the cotton and on top of the loop. You'll then need to glue the sides of the fabric that overhangs the front design down to meet the front.

You're finished! There are a lot of steps but they're mostly simple things that add up to a beautiful gift!

Let me know if you make either of these wonderful homemade items for your holiday hostess or anyone on your list this year! I'd love to see your personal touches on these suggestions.
Happy holidays and thank you for reading.

Comments
Post a Comment